I love trying out new and fun recipes and this past Halloween I tried to make some fondant for a cake. I have never made fondant before in my life. Generally I just ice my cakes with frosting. But I wanted to try and make a certain cake and got excited at being as glamorous as my favorite baking shows such as Cake Boss. I heard that Marshmallow Fondant is an easy and cheap way to make your own fondant. (or at least that is what several YouTubers told me!)
So I went out and bought the supplies for this recipe. I will say this recipe calls for a large amount of powdered sugar. I will recommend wearing a mask so that way you do not get the powder into your lungs like I did. Baker’s asthma is real life people so be safe! This is especially true if you already suffer from allergies (like me) or asthma already.
This was a really fun recipe and I did discover little tips and tricks that will help you bunches so let’s get mixing!
TIP 1: Make it the night or day before because the fondant really is supposed to sit in the fridge for 8 hours.
Above is the ingredients you will need. Mini Marshmallows, Powdered or Confectioners’ Sugar, Vanilla Extract, Food Dye, a couple tablespoons of water, microwave safe bowl, spatula, and cooking spray.
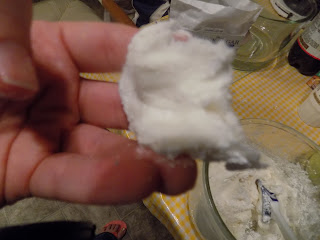
1. Place about half a bag in your bowl and add two tablespoons of tap water.
2. Then microwave your marshmallows for 15 second intervals. Stirring in-between.
TIP 2: The next trick I have is to spray your spatula with the cooking spray and stir your marshmallows until they are smooth.
Warning: You can burn the Marshmallows in the microwave so make sure you aren’t microwaving them more than 3 times. Sometimes just stirring will help break down the last few lumps.
3. Then once you have a smooth shiny consistency. You can add your food coloring.
TIP 3: Be sure to make the color darker than you want because it will be lighter in color once you add the sugar.
TIP 4: It is easier to add the color now though. If you add it later it will stain your counter tops.
4. Spray your spatula again
5. Add the powdered sugar one cup at a time. Or if you are like me just dump some in a little by little. WEAR YOUR MASK!
6. Then start mixing it really well.
Be prepared this is when things will start to get sticky!
TIP 5: Be sure you do not try to knead the fondant until it is very pliable and not sticky at all. If you try to take it out now you will have the biggest mess you have ever seen on your hands.
TIP 6: If you begin to have trouble mixing the mixture start using the spatula to knead it by pounding it with the spatula and making sure all sides of your fondant are being well incorporated. Good thing to get your frustration out on.
7. Once your fondant pulls and snaps away from the rest of the mixture it is ready to knead.
8. Now spray your hands with the cooking spray and grab a small amount of fondant and roll it into a ball.
9. Do this for the rest of the fondant.
TIP 7: This will make sure the fondant is able to be handled without sticking to your hands during the kneading process. Keep your cooking spray nearby as it’s a good un-sticki-fying tool.
10. Then combine all the balls of fondant you have make and start working it with your hands making it less sticky and easier to work with. Think shiny playdoh!
11. Then you will need to sprinkle your work surface with powdered sugar. Put that mask back on.
12. You will knead the fondant like you would bread. Working the last of the powdered sugar into it making it less sticky.
13. Once you have a good consistency you will roll it into another ball.
TIP 8: Again you want to spray down the fondant to get the rest of the powder off of it. And to make it shiny.
14. Get your Ziploc bag ready.
TIP 9: Do I even have to tell you to use Ziploc over Saran wrap. Way less mess way better airtight seal.
TIP 10: Spray the inside of the bag
15. Then once you have sprayed the inside of your bag you can put your fondant inside and work it into a log so you can squeeze the air out of it.
16. Refrigerate for at least 8 hours.
BUT KATIE . . . WHAT ABOUT THE NEXT DAY?!
The steps for the next day are simple.
- Take the fondant out and break it off and start working it in your hands. It will be HARD.
- Once the desired amount is soft you will roll it out with some more powdered sugar.
- Then you will apply it to lightly iced cake.
- TIP FINAL: You want the icing to be a thin consistency. No thick icing please!
- Then you will press it firmly onto the cake so it doesn’t slide off.
- Then cut off the excess and spray with (you guessed it!) cooking spray or a melted butter for a shiny look.
Voila! A beautiful cake with your own homemade fondant!
Let me know if you have as much success as I did. My fondant was beautiful but I may need more classes on art!
Comment below on any experiences you have had with fondant. (Do you like it? Any other tips or tricks. Disastrous failures.)
* All images and from my own disastrous kitchen. ;)


No comments:
Post a Comment